Semantic Segmentation
Overview
The Semantic Segmentation sample demonstrates pixel-level classification using CV-CUDA for preprocessing and TensorRT for inference. This advanced sample showcases:
Dense pixel-wise prediction for semantic segmentation
FCN-ResNet101 model for accurate segmentation
Advanced post-processing with bilateral filtering
Background blurring with foreground preservation
Smooth edge generation using joint bilateral filter
Usage
Segment an image and create a blurred background effect:
python3 segmentation.py -i image.jpg
The sample will:
Download FCN-ResNet101 model (first run only)
Export to ONNX and build TensorRT engine (first run only)
Segment the image to find objects (e.g., cats)
Create smooth mask with bilateral filtering
Blur background and composite with foreground
Save result as
cvcuda/.cache/cat_segmented.jpg
Specify custom output path:
python3 segmentation.py -i portrait.jpg -o segmented_portrait.jpg
Command-Line Arguments
Argument |
Short Form |
Default |
Description |
|---|---|---|---|
|
|
tabby_tiger_cat.jpg |
Input image file path |
|
|
cvcuda/.cache/cat_segmented.jpg |
Output segmented image path |
|
224 |
Target width for model input |
|
|
224 |
Target height for model input |
Implementation Details
The segmentation pipeline consists of:
Model setup (FCN-ResNet101 export and TensorRT engine building)
Image loading
Preprocessing (resize and ImageNet normalization)
Semantic segmentation inference
Post-processing (extract class probabilities, refine masks with bilateral filtering)
Background blur and compositing
Saving result
Code Walkthrough
Model Setup
# 1. Download the onnx model (if not already downloaded)
onnx_model_path = get_cache_dir() / f"fcn_resnet101_{args.height}x{args.width}.onnx"
if not onnx_model_path.exists():
    import torchvision  # noqa: E402

    fcn_resnet101 = torchvision.models.segmentation.fcn_resnet101(
        weights=torchvision.models.segmentation.FCN_ResNet101_Weights.COCO_WITH_VOC_LABELS_V1
    )
    export_segmentation_onnx(
        fcn_resnet101, onnx_model_path, (3, args.height, args.width), verbose=False
    )

# 2. Build the TensorRT engine (if not already built)
trt_model_path = (
    get_cache_dir() / f"fcn_resnet101_{args.height}x{args.width}.trtmodel"
)
if not trt_model_path.exists():
    engine_from_onnx(onnx_model_path, trt_model_path)
model = TRT(trt_model_path)
Model details:
FCN-ResNet101: Fully Convolutional Network with ResNet101 backbone
Training: Pretrained on COCO+VOC datasets
Classes: 21 classes (Pascal VOC) including background, person, cat, dog, etc.
Output: Dense predictions for each pixel
Loading and Preprocessing
# 4. Preprocess the image
# 4.1 Allocate the static imagenet mean and std tensors
#     This is only needed once and can be reused for all images
scale: np.ndarray = np.array([0.485, 0.456, 0.406], dtype=np.float32).reshape(
    (1, 1, 1, 3)
)
scale_tensor: cvcuda.Tensor = cvcuda.Tensor((1, 1, 1, 3), np.float32, "NHWC")
cuda_memcpy_h2d(scale, scale_tensor.cuda())

std: np.ndarray = np.array([0.229, 0.224, 0.225], dtype=np.float32).reshape(
    (1, 1, 1, 3)
)
std_tensor: cvcuda.Tensor = cvcuda.Tensor((1, 1, 1, 3), np.float32, "NHWC")
cuda_memcpy_h2d(std, std_tensor.cuda())

# 4.2 Add a batch dimension
frame_nhwc: cvcuda.Tensor = cvcuda.stack([input_image])

# 4.3 Resize the image
resized_tensor: cvcuda.Tensor = cvcuda.resize(
    frame_nhwc, (1, args.height, args.width, 3), cvcuda.Interp.LINEAR
)

# 4.4 Convert to float32
float_tensor: cvcuda.Tensor = cvcuda.convertto(
    resized_tensor, np.float32, scale=1 / 255
)

# 4.5 Normalize the image using imagenet mean and std
normalized_tensor: cvcuda.Tensor = cvcuda.normalize(
    float_tensor,
    scale_tensor,
    std_tensor,
    cvcuda.NormalizeFlags.SCALE_IS_STDDEV,
)

# 4.6 Convert to NCHW layout
tensor: cvcuda.Tensor = cvcuda.reformat(normalized_tensor, "NCHW")
Preprocessing includes:
Normalization Setup: ImageNet mean [0.485, 0.456, 0.406] and std [0.229, 0.224, 0.225]
Batching: Add batch dimension (HWC → NHWC)
Resizing: Scale to target model input size (default 224×224)
Float Conversion: uint8 [0,255] → float32 [0,1]
Normalization:
(x - mean) / stdLayout: NHWC → NCHW
Running Inference
# 5. Run the inference
# TRT takes list of tensors and outputs list of tensors
input_tensors: list[cvcuda.Tensor] = [tensor]
output_tensors: list[cvcuda.Tensor] = model(input_tensors)
output_tensor: cvcuda.Tensor = output_tensors[0]
Inference output:
Shape: [1, 21, H, W] - Batch × Classes × Height × Width
Values: Probabilities (post-softmax) for each class, range [0, 1]
Semantics: Higher values indicate higher confidence for that class
Post-Processing and Effects
# 6. Get outputs back to the host
output: np.ndarray = np.zeros(output_tensor.shape, dtype=output_tensor.dtype)
cuda_memcpy_d2h(output_tensor.cuda(), output)

# 7. Postprocess the outputs
# 7.1 Get the class probabilities for the cat class from 0-255
# Required to do on CPU, since cvcuda.Tensor doesn't support +,-,*,/ operations
class_index = 8  # cat (VOC class index)
# Extract the class probabilities for the given class_index, shape (1, 224, 224)
class_probs = output[:, class_index : class_index + 1, :, :]  # noqa: E203
# Move the class dimension to the end to get (1, 224, 224, 1)
class_probs = np.transpose(class_probs, (0, 2, 3, 1))
class_probs *= 255.0
class_probs = class_probs.astype(np.uint8)
if not class_probs.flags.c_contiguous:
    class_probs = np.ascontiguousarray(class_probs)

# 7.2 Move the class probabilities to the GPU
class_probs_tensor = cvcuda.Tensor(class_probs.shape, np.uint8, "NHWC")
cuda_memcpy_h2d(class_probs, class_probs_tensor.cuda())

# 7.3 Upscale the masks to match the original image size
upscaled_masks: cvcuda.Tensor = cvcuda.resize(
    class_probs_tensor,
    (frame_nhwc.shape[0], frame_nhwc.shape[1], frame_nhwc.shape[2], 1),
    cvcuda.Interp.LINEAR,
)

# 7.4 Create a blurred background
# Compute on the smaller resized image to save computation
blurred_background: cvcuda.Tensor = cvcuda.resize(
    cvcuda.gaussian(
        resized_tensor,
        kernel_size=(15, 15),
        sigma=(5, 5),
        border=cvcuda.Border.REPLICATE,
    ),
    (frame_nhwc.shape[0], frame_nhwc.shape[1], frame_nhwc.shape[2], 3),
    cvcuda.Interp.LINEAR,
)

# 7.5 Use joint bilateral filter to create smooth edge on the masks
gray_nhwc: cvcuda.Tensor = cvcuda.cvtcolor(
    frame_nhwc, cvcuda.ColorConversion.RGB2GRAY
)
jb_masks: cvcuda.Tensor = cvcuda.joint_bilateral_filter(
    upscaled_masks,
    gray_nhwc,
    diameter=5,
    sigma_color=50,
    sigma_space=1,
    border=cvcuda.Border.REPLICATE,
)

# 7.6 Create an overlay image of the masks
composite_image: cvcuda.Tensor = cvcuda.composite(
    frame_nhwc,
    blurred_background,
    jb_masks,
    3,
)

# 8. Save the overlay image
hwc_image = zero_copy_split(composite_image)[0]
write_image(hwc_image, args.output)

# 9. Verify output file exists
assert args.output.exists()
Advanced post-processing:
Class Extraction: Extract probability map for target class (cat = class 8)
Scale to uint8: Scale probabilities [0, 1] to [0, 255] for mask
Upscaling: Resize mask to original image size
Background Blur: Apply Gaussian blur to create blurred version
Bilateral Filtering: Smooth mask edges while preserving boundaries
Compositing: Blend original foreground with blurred background
Joint Bilateral Filter
The joint bilateral filter (cvcuda.joint_bilateral_filter()) is key to quality:
Purpose: Smooth mask while respecting image edges
Joint: Uses grayscale image to guide filtering
Parameters: diameter=5, sigma_color=50, sigma_space=1
Result: Smooth transitions without halo artifacts
Expected Output
The output shows the segmented object (e.g., cat) in focus with a smoothly blurred background, creating a portrait-style effect similar to DSLR bokeh.
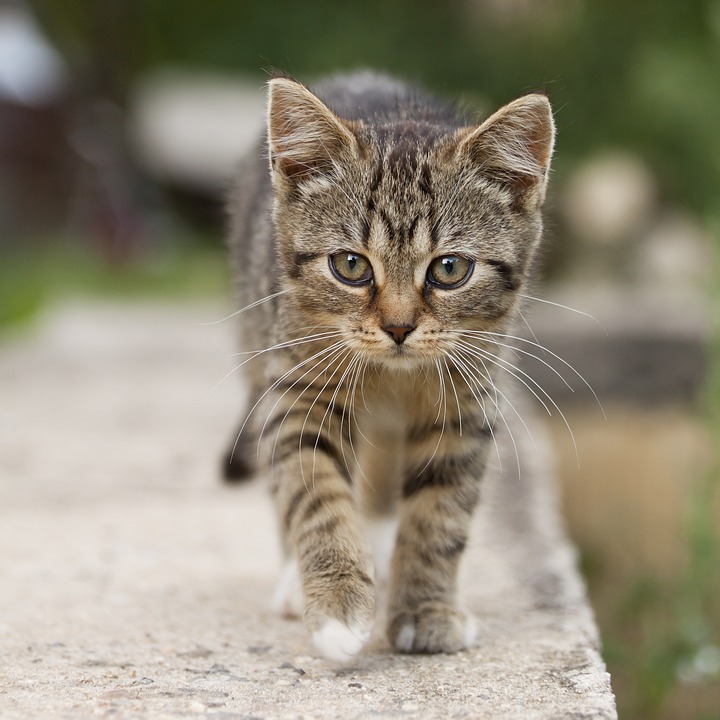
Original Input Image |
Output with Segmented Background |
Understanding Segmentation
FCN Output Format
FCN outputs a probability map for each class:
output.shape = [1, 21, 224, 224]
# output[0, 8, :, :] = probabilities for "cat" class at each pixel
Class Indices (Pascal VOC):
0: Background
8: Cat
12: Dog
15: Person
Modify class_index in the code to segment different objects.
CV-CUDA Operators Used
Operator |
Purpose |
|---|---|
Add batch dimension |
|
Resize image and masks to different resolutions |
|
Convert data types and normalize |
|
Apply ImageNet normalization |
|
Convert between NHWC and NCHW layouts |
|
Blur background for aesthetic effect |
|
Convert RGB to grayscale for bilateral filter |
|
Smooth mask edges while preserving boundaries |
|
Blend foreground and blurred background |
Common Utilities Used
read_image() - Load image as CV-CUDA tensor
write_image() - Save result
cuda_memcpy_h2d() - Upload normalization parameters
cuda_memcpy_d2h() - Download segmentation results
zero_copy_split() - Split batch efficiently
TRT - TensorRT wrapper
engine_from_onnx() - Build engine
export_segmentation_onnx() - Export FCN model
See Also
Image Classification Sample - Related preprocessing
Object Detection Sample - Bounding box detection
Gaussian Blur Operator - Blur effects
Common Utilities - Helper functions
References
FCN Paper - Fully Convolutional Networks for Semantic Segmentation