Conv2D
Overview
The Conv2D sample demonstrates GPU-accelerated 2-D convolution using CV-CUDA’s
conv2d operator. The sample wraps a single RGB image in an
ImageBatchVarShape, constructs a 3×3 sharpening kernel as a float
ImageBatchVarShape, and runs the convolution on the GPU. Per-image kernel
anchors are supplied via a small Tensor of shape (N, 2).
Usage
Basic Usage
Apply the default sharpening filter to an image:
python3 conv2d.py -i input.jpg
Custom Input and Output
Specify both input and output paths:
python3 conv2d.py -i image.jpg -o cat_conv2d.jpg
Command-Line Arguments
Argument |
Short Form |
Default |
Description |
|---|---|---|---|
|
|
tabby_tiger_cat.jpg |
Input image file path |
|
|
cvcuda/.cache/cat_conv2d.jpg |
Output image file path |
Implementation
Batch and Kernel Setup
h, w, c = input_image.shape[0], input_image.shape[1], input_image.shape[2]

# conv2d operates on ImageBatchVarShape.  Applying a sharpening kernel
# directly on uint8 would overflow (center weight 5 * 200 > 255), so we
# first promote to float32, convolve, then clamp back to uint8.
float_nhwc: cvcuda.Tensor = cvcuda.convertto(
    input_image.reshape((1, h, w, c), "NHWC"), dtype=np.float32
)
float_hwc: cvcuda.Tensor = float_nhwc.reshape((h, w, c), "HWC")

src_image: cvcuda.Image = cvcuda.as_image(float_hwc.cuda(), cvcuda.Format.RGBf32)
src_batch: cvcuda.ImageBatchVarShape = cvcuda.ImageBatchVarShape(1)
src_batch.pushback(src_image)

# 3x3 sharpening kernel (single-channel float — applied to each colour
# channel independently).
sharpen_np: np.ndarray = np.array(
    [[0, -1, 0], [-1, 5, -1], [0, -1, 0]], dtype=np.float32
).reshape(3, 3, 1)
kernel_tensor: cvcuda.Tensor = cvcuda.Tensor(
    (3, 3, 1), dtype=np.float32, layout="HWC"
)
# upload_tensor honours the kernel tensor's row pitch (CVCUDA pads each row
# to an alignment boundary, so the 3-float rows are not packed contiguously).
# A packed copy here would scramble the kernel and blacken the output.
upload_tensor(sharpen_np, kernel_tensor)
kernel_image: cvcuda.Image = cvcuda.as_image(
    kernel_tensor.cuda(), cvcuda.Format.F32
)
kernel_batch: cvcuda.ImageBatchVarShape = cvcuda.ImageBatchVarShape(1)
kernel_batch.pushback(kernel_image)

# Anchor (-1, -1) lets the operator place the kernel centre automatically.
anchor_np: np.ndarray = np.array([[-1, -1]], dtype=np.int32)
anchor_tensor: cvcuda.Tensor = cvcuda.Tensor((1, 2), dtype=np.int32, layout="NC")
upload_tensor(anchor_np, anchor_tensor)
Conv2D Operator Call
h, w, c = input_image.shape[0], input_image.shape[1], input_image.shape[2]

# conv2d operates on ImageBatchVarShape.  Applying a sharpening kernel
# directly on uint8 would overflow (center weight 5 * 200 > 255), so we
# first promote to float32, convolve, then clamp back to uint8.
float_nhwc: cvcuda.Tensor = cvcuda.convertto(
    input_image.reshape((1, h, w, c), "NHWC"), dtype=np.float32
)
float_hwc: cvcuda.Tensor = float_nhwc.reshape((h, w, c), "HWC")

src_image: cvcuda.Image = cvcuda.as_image(float_hwc.cuda(), cvcuda.Format.RGBf32)
src_batch: cvcuda.ImageBatchVarShape = cvcuda.ImageBatchVarShape(1)
src_batch.pushback(src_image)

# 3x3 sharpening kernel (single-channel float — applied to each colour
# channel independently).
sharpen_np: np.ndarray = np.array(
    [[0, -1, 0], [-1, 5, -1], [0, -1, 0]], dtype=np.float32
).reshape(3, 3, 1)
kernel_tensor: cvcuda.Tensor = cvcuda.Tensor(
    (3, 3, 1), dtype=np.float32, layout="HWC"
)
# upload_tensor honours the kernel tensor's row pitch (CVCUDA pads each row
# to an alignment boundary, so the 3-float rows are not packed contiguously).
# A packed copy here would scramble the kernel and blacken the output.
upload_tensor(sharpen_np, kernel_tensor)
kernel_image: cvcuda.Image = cvcuda.as_image(
    kernel_tensor.cuda(), cvcuda.Format.F32
)
kernel_batch: cvcuda.ImageBatchVarShape = cvcuda.ImageBatchVarShape(1)
kernel_batch.pushback(kernel_image)

# Anchor (-1, -1) lets the operator place the kernel centre automatically.
anchor_np: np.ndarray = np.array([[-1, -1]], dtype=np.int32)
anchor_tensor: cvcuda.Tensor = cvcuda.Tensor((1, 2), dtype=np.int32, layout="NC")
upload_tensor(anchor_np, anchor_tensor)
Key points:
ImageBatchVarShape input:
conv2drequires the source image(s) wrapped in anImageBatchVarShape; individualTensorobjects must be converted viacvcuda.as_imagefirst.Float kernel: The convolution kernel must use
cvcuda.Format.F32; integer kernels are not supported.Kernel anchor: A
Tensorof shape(N, 2)with layout"NC"provides the(x, y)anchor for each image;(-1, -1)selects the kernel centre automatically.Border mode:
REFLECT101avoids the dark halo at image edges thatCONSTANT(zero) padding produces when sharpening.Result extraction: The output
ImageBatchVarShapeis iterated to retrieve each resultImage, which is then wrapped back into an HWCTensorfor saving.
Expected Output
The output image shows the input with edges and fine detail enhanced by the sharpening kernel:
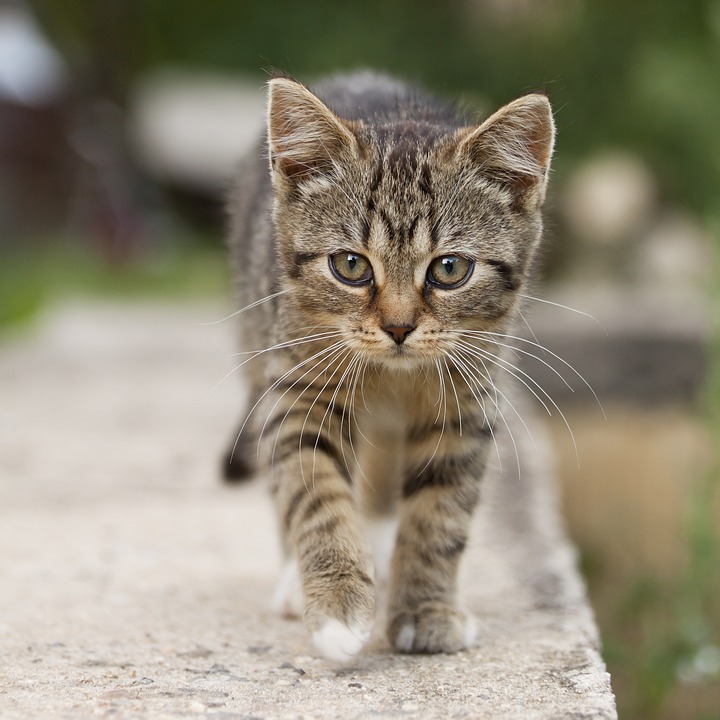
Original Input Image |
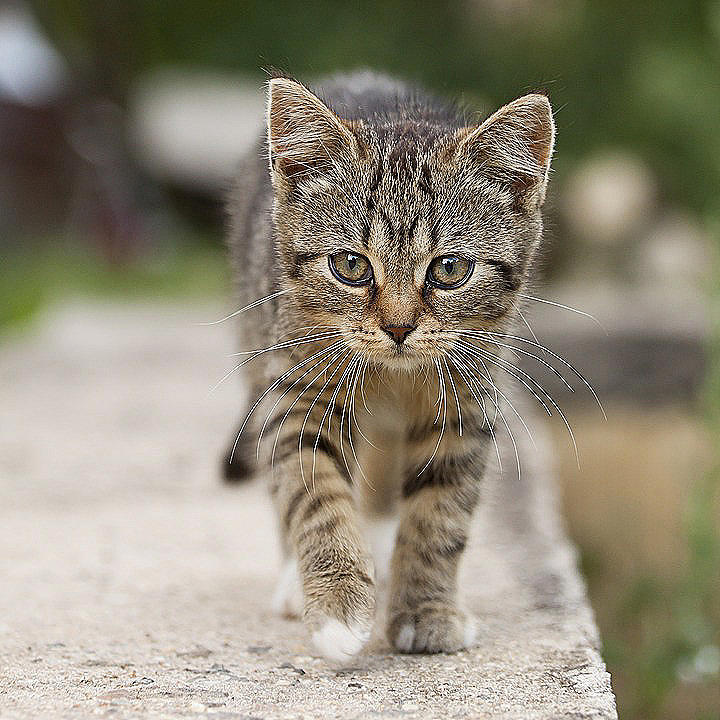
Output: Sharpened with 3×3 kernel |
CV-CUDA Operators Used
Operator |
Purpose |
|---|---|
Apply a per-image 2-D convolution kernel over an |
Common Utilities Used
read_image() - Load image as CV-CUDA tensor
write_image() - Save convolved image
cuda_memcpy_h2d- Upload NumPy kernel weights and anchor coordinates to the GPU
See Also
Resize Operator - Another spatial image operator
Common Utilities - Helper functions used by all operator samples